
Greenleaf Garden Services
Greenleaf Garden Services
...for all your gardening needs...
...for all your gardening needs...
01502 450029
01502 450029
07943 468079
07943 468079
Greenleaf Garden Services Testimonials and Credentials...
Greenleaf Garden Services Testimonials and Credentials...
At Greenleaf Garden Services, customer satisfaction with the garden services we offer is of paramount importance and on this page, you’ll find out exactly what our customers think about us. We've also posted some interesting articles on raised beds and compost heaps , written by Martin Fiddes of Greenleaf Garden Services, at the bottom of this page under the 'Further Information' header - well worth a look!
And we’re sure you’ll also find our Greenleaf Garden Services credentials section of interest as well with the various news items - including the publishing of articles by Greenleaf Garden Services' very own Martin Fiddes in the Daily Express and examples of his Master Composter work - hopefully underlining the quality of our garden maintenance services and depth of gardening knowledge.
Testimonials
"Martin is my gardener and I've found him to be very satisfactory and conscientious. He has a good knowledge of plants, no job is too big or too small for him to undertake and I would recommend him to anyone."
Mrs A Smith, Oulton Broad
"We've hit the jackpot! We've found a gardener who is knowledgeable, hard working and cheerful."
Mrs M Hibberd, Lowestoft
"I purchased a lean-to greenhouse from The Greenhouse People and Martin did an excellent job of assembling it in a difficult spot. I'm more than happy with the installation and service provided by Greenleaf Garden Services."
Mr A Hall, Barnby
"It digs, it prunes, it cultivates. It's Martin, your complete gardener."
Keith H, Lowestoft
"We found Martin to be a hard, good reliable worker. Did a terrific job, very tidy and a nice person too."
Mrs S Gillies, Pakefield
"Just a quick note to say what a fantastic job you did of our garden in a short space of time. Thanks again for the work you have done and I will be recommending you to people at work."
Mr M Howson, Gunton
We're also listed on iSuffolk, the local business directory, so please feel free to visit and leave your own review.
Credentials
We're rightly proud at Greenleaf Garden Services in Lowestoft to have made it into print in the Daily Express and Daily Telegraph , two of the country's leading daily newspapers. Below you can read the published articles by Greenleaf Garden Services' Martin Fiddes in the Daily Express.
You'll also be able to find out how the Lowestoft Journal reported on Martin's Master Composter success - the basis for Greenleaf Garden Services' environmentally friendly approach to gardening and recycling - and get some composting tips from the Home Composter, a newsletter created by Martin.


Gallery
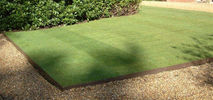
Our ever increasing gallery is where we show off the many garden services in Lowestoft we provide with dividing perennials, shed and garden building renovations, soil improvement and pruning taking place in the winter months and more typical garden tasks - such as lawn care, edging, deadheading, weeding, effective irrigation, summer pruning of fruit trees and pest and disease control - carried out during the summer months.


Further Information
Raised Beds
Practical assistance with raised bed vegetable gardening is one of the many garden maintenance and gardening services offered by Greenleaf Garden Services.
If you’re thinking of installing raised beds into your garden for vegetable production or even to grow ornamental flowers or shrubs, the following raised bed advice Greenleaf Garden Services have put together may well be of interest...
It’s certainly true that when growing and gardening in a compacted space like raised beds, traditional plant spacing and growing rules go out the window somewhat. You can plant much closer together and create a micro-climate where plants will benefit, weeds are suppressed and soil-borne diseases – because the compost/soil you are growing in is replaced or at least replenished each year – find it difficult to thrive.
Because you are planting many different crops in a small space, pests can also struggle to get a foothold; growing onions next to carrots, for example, helps deter carrot fly as they don’t like the odour of alliums!
It’s very difficult to give a definitive list of plant spacings for raised bed grown crops, but the general rule is the close you grow your vegetables, the smaller they will be; onions and beetroot are prime examples where those destined for pickling are planted around 5cm apart, half the usual spacing.
Root crops and alliums are the easiest to manage (such as onions, parsnips, carrots, beetroot and leeks) and I’d simply halve the recommended spacing for all these crops. I’d certainly try and group brassicas (sprouts, cabbage and broccoli) together when growing in raised beds as these will all inevitably be under attack from the cabbage white butterfly and its ravenous caterpillars.
You’ll need to protect these crops with butterfly netting and the easiest way to do this is by draping the net over crop protection hoops or a similar kind of support. These hoops – or whichever support system you decide to use – will prove invaluable as they can be used to support fleece or polythene early in the season which allows you to turn the raised bed into a warm and protected seed bed for early sowing of bedding plants and annuals!
Back to vegetables though and all the brassica crops listed above really enjoy their space so you’ll be surprised as to how few you can fit in a bed, but don’t waste the space that these slow growing crops take up; try interplanting them with much faster salads such as lettuce and radish.
Courgettes are another plant which like to stretch out and although you can cram these into a raised bed much closer than the suggested 90cm, harvesting can prove to be a bit of a hack through the jungle! If you can put up with it though, and the plants flourish, it’s not a problem.
As courgettes are a thirsty lot, it’s worth mentioning the importance of watering your raised bed at this juncture. Unless you’ve included plenty of organic matter and humus (the sticky black stuff in compost), raised beds are notorious for drying out quickly and some sort of irrigation system is desirable. If you’re going to be on hand to water regularly in the summer then you might do without (and, as I said earlier, there’s plenty of water retaining material in the bed) but as most of these systems deliver water directly to the soil, they prove very effective.
A soaker hose is a prime example (sometimes called a seep hose) as the droplets of water fall straight onto the soil surface and evaporation is avoided; these porous hoses can also be used in garden beds and herbaceous borders – even buried under lawns – and should be your first port of call.
Finally, a list of the other benefits that gardening in raised beds can bring. Some you may have already thought of and others might come as a pleasant surprise but one thing they have in common is that Greenleaf Garden Services can help with them all;
- Easier management of the soil (including composting/fertilising)
- Warming the soil with a cloche or polythene prior to planting
- Less physical exertion such as digging, cultivating etc
- Quicker and easier to manage for the gardener in a hurry
- Less expensive to water, feed, fertilise and generally grow
- Ideal for when soil conditions are poor
- Combats problems with long and short term soil borne diseases
- Closer planting means more flowers and vegetables
- Good for weed suppression
- Ideal for growing in otherwise unsuitable locations eg on the patio
- Excellent solutions for small gardens
- Easier on the back
- Make crop rotation easier when growing vegetables
Slugs in Compost Heaps
Here at Greenleaf Garden Services we receive plenty of enquiries regarding garden compost bins and the problems which can occur inside. One common gardening question is what to do about slugs that make a compost bin their home.
We’re in the fortunate position at Greenleaf Garden Services to have a Master Composter within our ranks and giving home composting advice and practical help is a garden service we offer regularly. Here’s our advice on what to do should you find slugs in your garden compost bin...
Unfortunately, the conditions inside a compost bin are very much to the liking of slugs and snails and it's no surprise they choose to make this environment their home. However, these often loathed creatures do a great job in the compost bin where breaking down the new material is the aim, and the news is not all bad. You'll find them in the higher reaches of the bin where new material is deposited so the chances of removing them when harvesting the mature compost from the bottom is minimal; if they're safely ensconced in your bin or heap then they won't be feasting on your garden vegetables, annuals and perennials and any eggs they lay in the heap are often killed off by high heap core temperatures or eaten by the millions of organisms - including centipedes and spiders - which also live in the heap.
The above are all good reasons to applaud the fact that slugs are present in the compost bin and getting rid of them is both a time consuming and difficult task. Using slug pellets puts the entire compost heap in jeopardy as the chemicals in the pellets will kill off other essential composting organisms; it's certainly not recommended. You could shovel out the contents of you bin, spread it on a tarpaulin and let the birds feast on the inhabitants but this is also unsatisfactory and very messy - it really is best to leave the slugs to their own devices and enjoy quicker composting turnaround times!
And don’t forget to contact us if you’d like us to recommend and manage a compost bin for you; home composting can save you money, give your garden real health benefits and help the environment at the same time.
Improving the Soil
At Greenleaf Garden Services we are acutely aware that the key to growing healthy, prolific plants and high yielding fruit and vegetables is right beneath our feet – the soil.
Purchasing plants can be a costly business and if your garden soil isn’t fertile or prepared well enough to sustain the plants you are introducing, then it’s a case of money down the drain. Even dividing perennials and trying to grow cuttings of existing garden plants is a futile exercise if the growing medium isn’t up to it, but with our experience and knowledge of soils, improving your soil is a garden service we offer.
Here’s a taster of the advice Greenleaf Garden Services can give on improving garden soil...
Good soil should both drain easily and retain moisture; it should be crumbly but not dusty and it certainly shouldn’t crust up after watering. Any soil structure which does this is unlikely to support beneficial creatures (such as earthworms) and more importantly will not be able to hold and supply any of the nutrients essential for plant growth.
Giving it to you straight, improving a soil in the state you describe into a successful vegetable growing medium is physically hard work. You’ll need to add plenty of organic matter – in the form of well rotted home-made compost, bagged farmyard manure and horse manure, leaf mould and even mushroom compost; local authorities often also sell bags of soil improver (the result of their own green waste recycling programmes) which are often available at recycling centres – and this is usually added to a vegetable plot in autumn or early winter to improve existing soil, through the action of the winter frosts and rain and earthworm activity.
This organic matter is then broken down further by the creatures and organisms which live in the soil and the result is humus, part of which is a sticky black substance which does incredible work in the soil. We can thank humus for nutrient retention and release, the crumb structure of the soil, drainage and moisture retention and plenty more.
It’s certainly possible to ship in organic matter in the forms mentioned above and dig in the material either by single or double digging at almost any time of year – as long as the ground is not frozen, waterlogged or baked hard - but this is a job Greenleaf Garden Services take on in the autumn when soil and weather conditions at the their best.
If the soil is currently in a poor condition, you’ll need to add a layer of organic matter at least 2 inches thick to your beds and borders and once the soil has been improved generally, you can start looking at improving certain areas to tailor particular crops and practising crop rotation when growing vegetables, which is designed to help prevent pest and disease build-up and prepare the soil for the next crop; Greenleaf Garden Services can advise you on this.
Green manures are another consideration; these crops – usually clover, beans or other bulky, quick growing plants – are grown out of season and skimmed off and dug into the ground before they run to seed, adding plenty of organic matter to the soil.
As you can see, the recipe for good soil is can be complex and involves plenty of elbow grease – something here at Greenleaf Garden Services we don’t mind!
Soil Warming Cables Propagation Bench
To make the most of your greenhouse in late winter/ early spring and to bring on both garden ornamental and vegetable seedlings far quicker than nature will allow, you will need a source of localised basal heat to allow seeds to germinate – and here at Greenleaf Garden Services, we have extensive experience of greenhouse propagation benches.
A popular, inexpensive and efficient way of providing the basal heat to encourage seed germination and healthy seedling growth and is to use flexible and efficient soil warming cables to make a heated propagation bench for the garden greenhouse and with construction relatively straightforward, building a propagation bench is also a great garden DIY project!
Firstly, you will need a suitable section of greenhouse staging or benching. A tray is best as you’ll need the depth to cover the warming cables with sand, but try to avoid painted surfaces (the heat can discolour them) and check the tray surface is free of sharp objects – piercing the cable means it cannot be used.
Soil warming cables come in various lengths so you’ll need to choose the length of cable for the size of area you want to heat. The heating cable is laid out in loops roughly 8-9cm apart so use a piece of string or rope to replicate this layout and ensure you get the right length of cable. Cover the looped cable with sand to a depth of 1-2cm then place your seed trays or pots on the heated sand bed.
Although the cables will raise the ambient soil temperature in the trays by 8-12 degrees C, you can influence the heat generated by the cable by placing material beneath. For example, to create a cooler propagation bed, position a paving slab or similar underneath the cables and use polystyrene for a warmer bed.
Opinion is divided as to which type of sand is best to fill your propagation bed with; some say that sharp sand is better as the more angular granules allow for better drainage and there’s also a train of thought that soft sand is the one to go for as the smoother grains sit together, providing better insulation and distributing the heat more effectively. Either way, your set-up will be efficient!
Greenleaf Garden Services also suggest introducing polystyrene to the base of the bench for additional insulation and to get the most from your heating cables, this layer should be sandwiched between the base (black polythene) and the sand. It’s also worth placing some polystyrene up the sides of the bench as well to plug another potential ‘heat leak’.
Finally, a thermostat is an excellent way of taking more accurate control of your propagation bench. A thermostat with a sensor can be attached to the heating cable to give control over the heat output and when setting up the cables it's best to position the thermostat sensor as near to the area the heat is required. You're interested in the temperature of the soil in the seed trays around the root zone of seedlings, so pushing the sensor into the compost should give the best results.